
Deploy production applications on VPS for a fraction of the US Cloud cost
A guide to deploy any services on VPS: performant solution for a fraction of the cloud cost.

I used to think deploying a full-stack application has to be expensive.
The choices were either paying for the big-3 cloud services - AWS, GCP, Azure - or another a online provider such as Heroku, Render, or Railway.
In each case, whether the free tier is extremely limited, or serving performant applications requires additional paid services such as Redis caching or Database. Even for my 100+ users…
Until i discovered how to deploy on a VPS: Virtual Private Server.
Since, most of my projects are deployed this way, either to deploy production applications for my clients, host my personal projects for my couple of users, or just demos for my content.
At first, deploying on VPS looks quite intimidating. It doesn’t come with preconfigured services the cloud provides. But once you understood the basics, launching a new application will be a piece a cake!
Let me walk you through the process.
We will buy a new VPS instance, secure it, and deploy our application on it.
As an example, we will develop a simple back-end in Python using FastAPI and make it available to anyone on the web.
Let’s begin!
To ease the reading, you can check the project Github repository where you can find all code relative to this article.
The application
We create a Note-Taker application. Or more exactly the Back-End. For the design, it allows users to add, delete, and get all stored notes.
Regarding the infrastructure, we store the data in-memory: if the server restarts, the data is lost. But using the Clean Architecture in this case make the change from in-memory to Postgres or MongoDB an easy task for later.
Learn more about the Clean Architecture in a previous article:

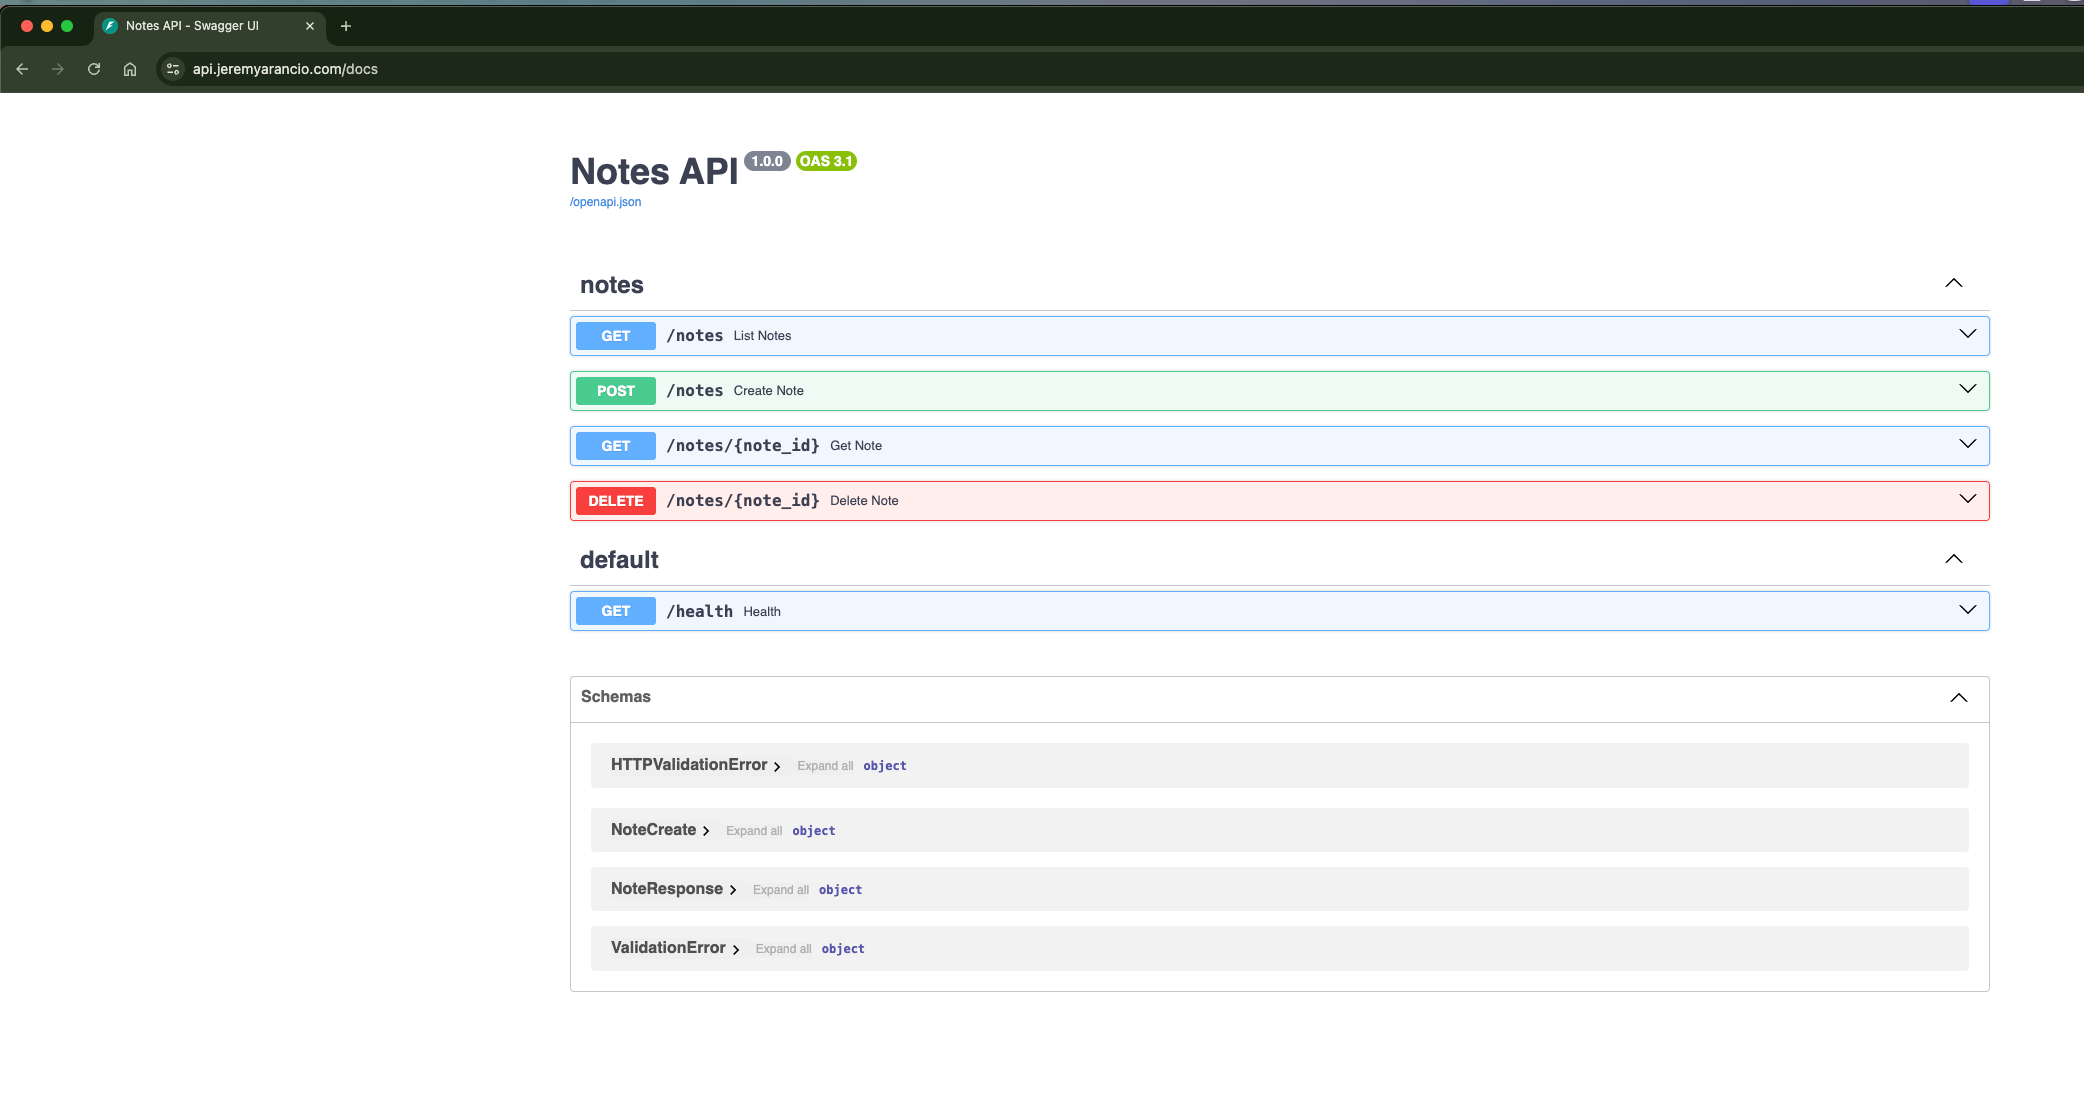
For the API, we use FastAPI for its modernity and ease of implementation. We define 4 initial endpoints:
POST /notes: create a note composed of a title and content
GET /notes: return all notes
GET /notes/{note_id}: return a specific note
DELETE /notes/{note_id}: delete a note
#src/app/interface/api/routers/note.py
from typing import Annotated
from uuid import UUID

from fastapi import APIRouter, Depends, Response

from app.application.note import NoteService
from app.application.ports.notes import INoteRepository
from app.domain.note import NoteId
from app.interface.dependencies import get_note_repository
from app.interface.schemas import NoteCreate, NoteResponse


router = APIRouter(prefix="/notes", tags=["notes"])


@router.post("")
def create_note(
    payload: NoteCreate,
    repository: Annotated[INoteRepository, Depends(get_note_repository)],
) -> Response:
    note = payload.to_note()
    NoteService.create(note=note, repository=repository)
    return Response(content="Note created.", status_code=201)


@router.get("")
def list_notes(
    repository: Annotated[INoteRepository, Depends(get_note_repository)],
) -> list[NoteResponse]:
    return [NoteResponse.from_note(n) for n in NoteService.list(repository)]


@router.get("/{note_id}")
def get_note(
    note_id: UUID,
    repository: Annotated[INoteRepository, Depends(get_note_repository)],
) -> NoteResponse:
    note = NoteService.get(note_id=NoteId(note_id), repository=repository)
    return NoteResponse.from_note(note)


@router.delete("/{note_id}")
def delete_note(
    note_id: UUID,
    repository: Annotated[INoteRepository, Depends(get_note_repository)],
) -> Response:
    NoteService.delete(note_id=NoteId(note_id), repository=repository)
    return Response(content="Note deleted.", status_code=204)
Once running, we can call the server API locally.
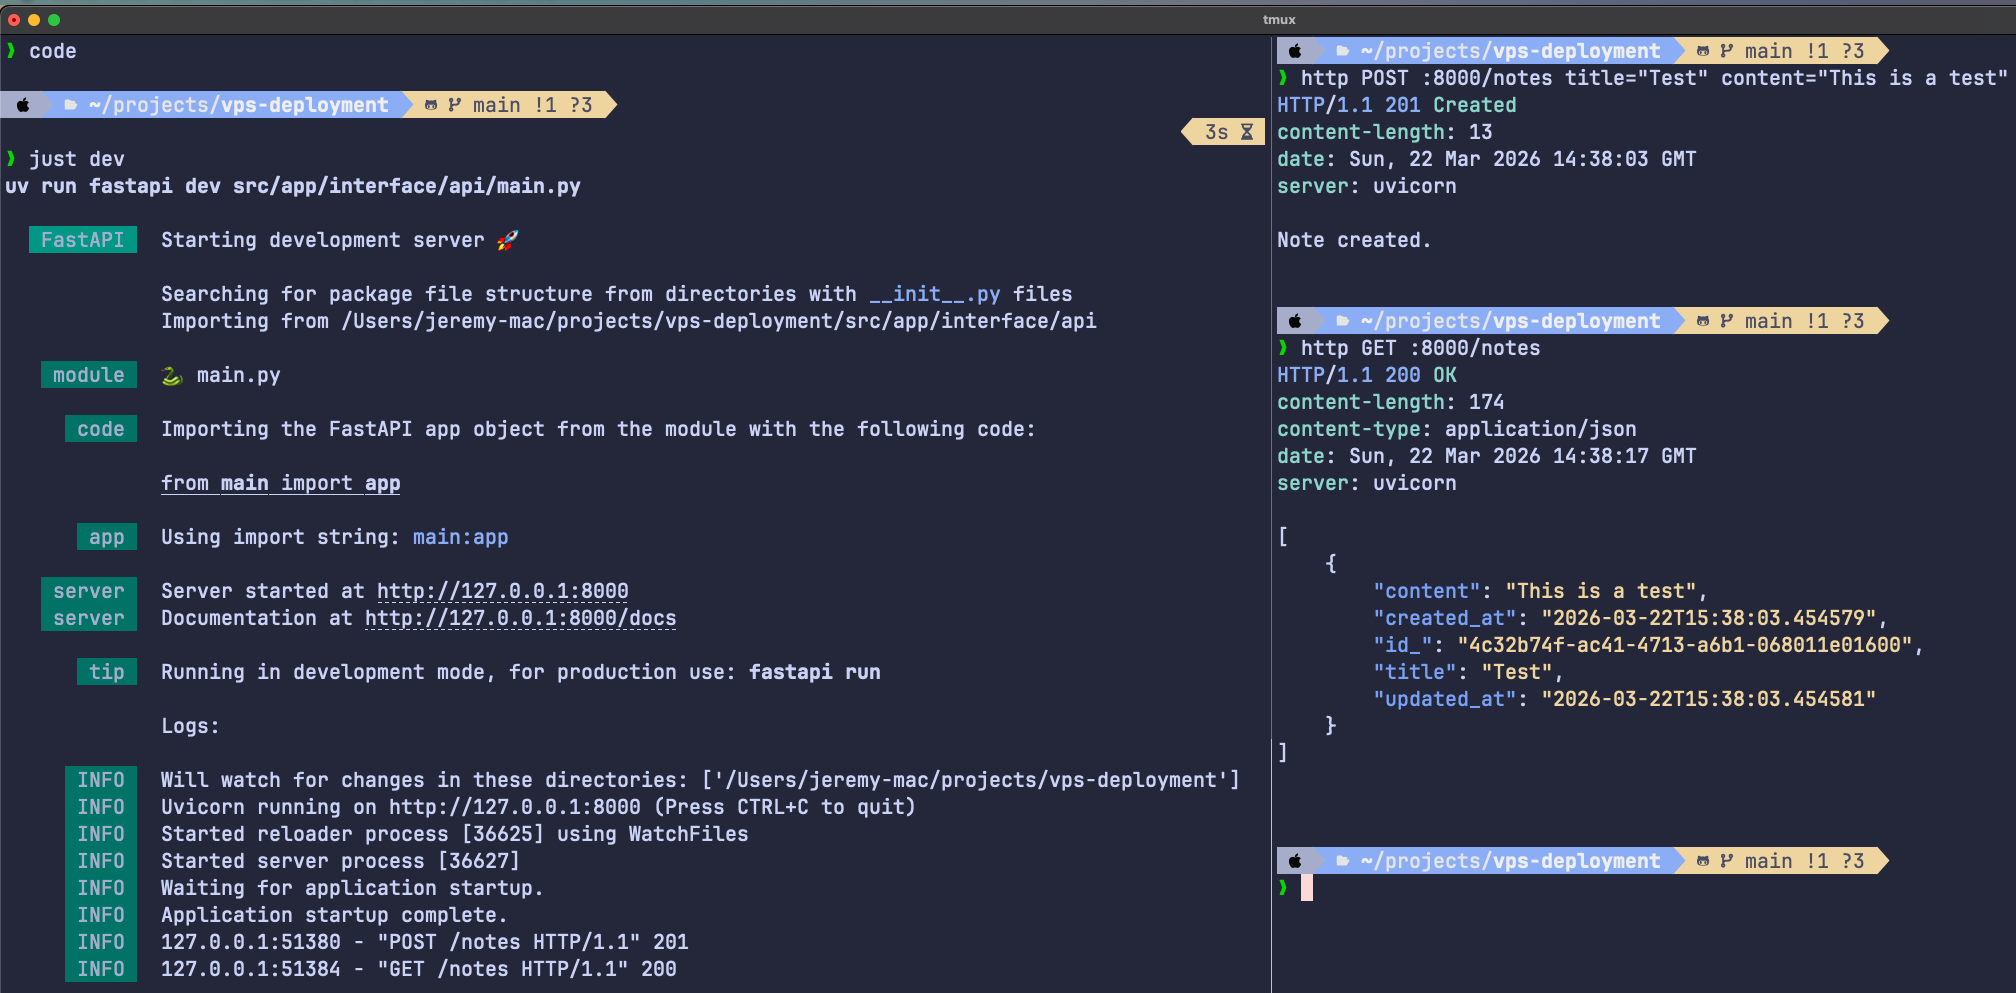
Success, it works! It’s time to get it out and make it online.
To prepare the field for deployment and online serving, we containerize the application with Docker. We choose Docker Compose as container orchestrator: simple to configure - easy to add services such as databases, UI, or caching - perfect to switch between development and production environment.
We prepare the Dockerfile to build the FastAPI server:
FROM python:3.12-slim

COPY --from=ghcr.io/astral-sh/uv:latest /uv /uvx /bin/

WORKDIR /app

COPY pyproject.toml uv.lock ./

RUN uv sync --frozen --no-dev --no-install-project

COPY . .

RUN uv sync --frozen --no-dev

EXPOSE 8000

CMD ["uv", "run", "fastapi", "run", "src/app/interface/api/main.py", "--host", "0.0.0.0", "--port", "8000"]
Next step is to prepare the compose files for deployment.
I say files for the reason we need to distinguish development from production environments. Docker compose becomes handy since you can “compose” configurations together following a set of rules.
We create 3 configurations:
compose.yml for the foundations,
compose.override.yml that automatically overrides the compose.yml in development mode,
compose.prod.yml for production deployment.
# Dev
docker compose up -d
# Prod
docker compose -f compose.yml -f compose.prod.yml up -d
We’ll later configure those files for production, stick with me.
Here’s how look like our compose.yml so far. It simply build and serve the FastAPI service on localhost:8000 from the root of the codebase.
#compose.yml
services:
api:
build: .
ports:
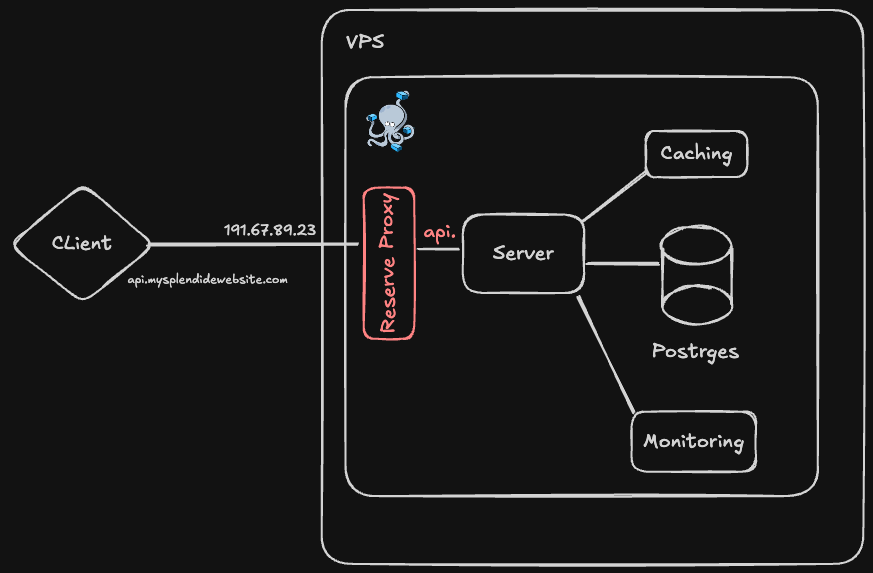
- "8000:8000"Of course, we cannot serve this to our users. We need to configure our production application to serve the API on a more suitable host, like app.mysplendidewebsite.com.
“The Reverse Proxy enters the room”.
Reverse proxy & DNS
A Reverse Proxy acts as middleman between the client (web app/mobile app) and our services. Its responsibilities are numerous and make an application deployable to production, such as:
Redirect requests to the appropriate service
TLS termination (HTTPS connections)
Rate limiting
Load balancer to share the traffic between replicas
And more…
Note: I actually described 3 different systems: the Reverse Proxy, the API Gateway, and the Load Balancer. But nowadays, these systems overlap. Check this video to know more about the differences.
Nginx and Traefik are two standard Reverse Proxies. I personally prefer Traefik since it synergizes well with Docker Compose.
We’ll use it to not only redirect the client’s requests to our API, but also secure our application with rate limiting and security headers.
As base configuration (compose.yml), we open the port 80 exclusively for HTTP requests (unsecured) and redirect any calls to api. subdomain to our api, running on port 8000 in the Docker compose network. I store the DOMAIN name in an .env file I configure depending on the environment (dev or prod).
Note the port 8000 is not accessible outside of the Docker Compose network. Indeed, Docker can bypass the Reverse proxy with port declaration, making the system unsecure.
#compose.yml
services:
  traefik:
    image: traefik:v3.6.1
    command:
      - "--providers.docker=true"
      - "--providers.docker.exposedbydefault=false"
      - "--entrypoints.web.address=:80"
    ports:
      - "80:80"
    volumes:
      - /var/run/docker.sock:/var/run/docker.sock:ro

  api:
    build: .
    labels:
      - "traefik.enable=true"
      - "traefik.http.routers.api.rule=Host(`api.${DOMAIN:-localhost}`)"
      - "traefik.http.routers.api.entrypoints=web"
      - "traefik.http.services.api.loadbalancer.server.port=8000"
For development, we enable access to the Traefik dashboard on the port 8080 and build the Docker image from the repository directly. Docker Compose automatically replace commands from compose.yml and append actions to services ( build: .).
Naming .override.yml is automatically recognized by Docker and doesn’t require any change in the CLI command:
docker compose up -d
# compose.override.yml
services:
  traefik:
    command:
      - "--providers.docker=true"
      - "--providers.docker.exposedbydefault=false"
      - "--entrypoints.web.address=:80"
      - "--api.dashboard=true"
      - "--api.insecure=true"
    ports:
      - "8080:8080"

  api:
    build: .
For production, we add replicas to our API service for redundancy. We also add a Rate Limiting + a Secure header to prevent any attack once deployed. We also add a restart policy to be sure the services restart automatically in case of crash.
Regarding the Docker Image for our API service, instead of building it from the code, we’ll pull it already built from the container registry of our choice. I decided to go with Github Container Registry (ghcr.io), but feel free to use the one you prefer. It will be extremely useful for the CI/CD pipelines…
#compose.prod.yml
services:
  traefik:
    restart: unless-stopped

  api:
    image: ghcr.io/jeremyarancio/vps-deployment-api:latest
    deploy:
      replicas: 3
    labels:
      # Rate limiting: 50 req/s average, allows bursts up to 100
      - "traefik.http.middlewares.api-ratelimit.ratelimit.average=50"
      - "traefik.http.middlewares.api-ratelimit.ratelimit.burst=100"
      # Prevents clickjacking by blocking iframe embedding
      - "traefik.http.middlewares.api-headers.headers.frameDeny=true"
      # Tells older browsers to block reflected XSS attempts
      - "traefik.http.middlewares.api-headers.headers.browserXssFilter=true"
      # Prevents browsers from MIME-sniffing a response away from the declared content type
      - "traefik.http.middlewares.api-headers.headers.contentTypeNosniff=true"
      # Apply middlewares
      - "traefik.http.routers.api.middlewares=api-ratelimit,api-headers"
    restart: unless-stopped
We simply run the following command to launch our system. Docker Composewill take care of creating the configuration based on the rules we introduced previously. We also add the environment variables for production as a .env.prod file.
Note that Docker Compose automatically considers .env if not —env-file is indicated.
docker compose -f compose.yml -f compose.prod.yml --env-file .env.prod up -dWe’re now ready to set up the VPS for deploying our application!
Configure the VPS
Our application is now ready to be deployed on VPS. But first, let’s get one!
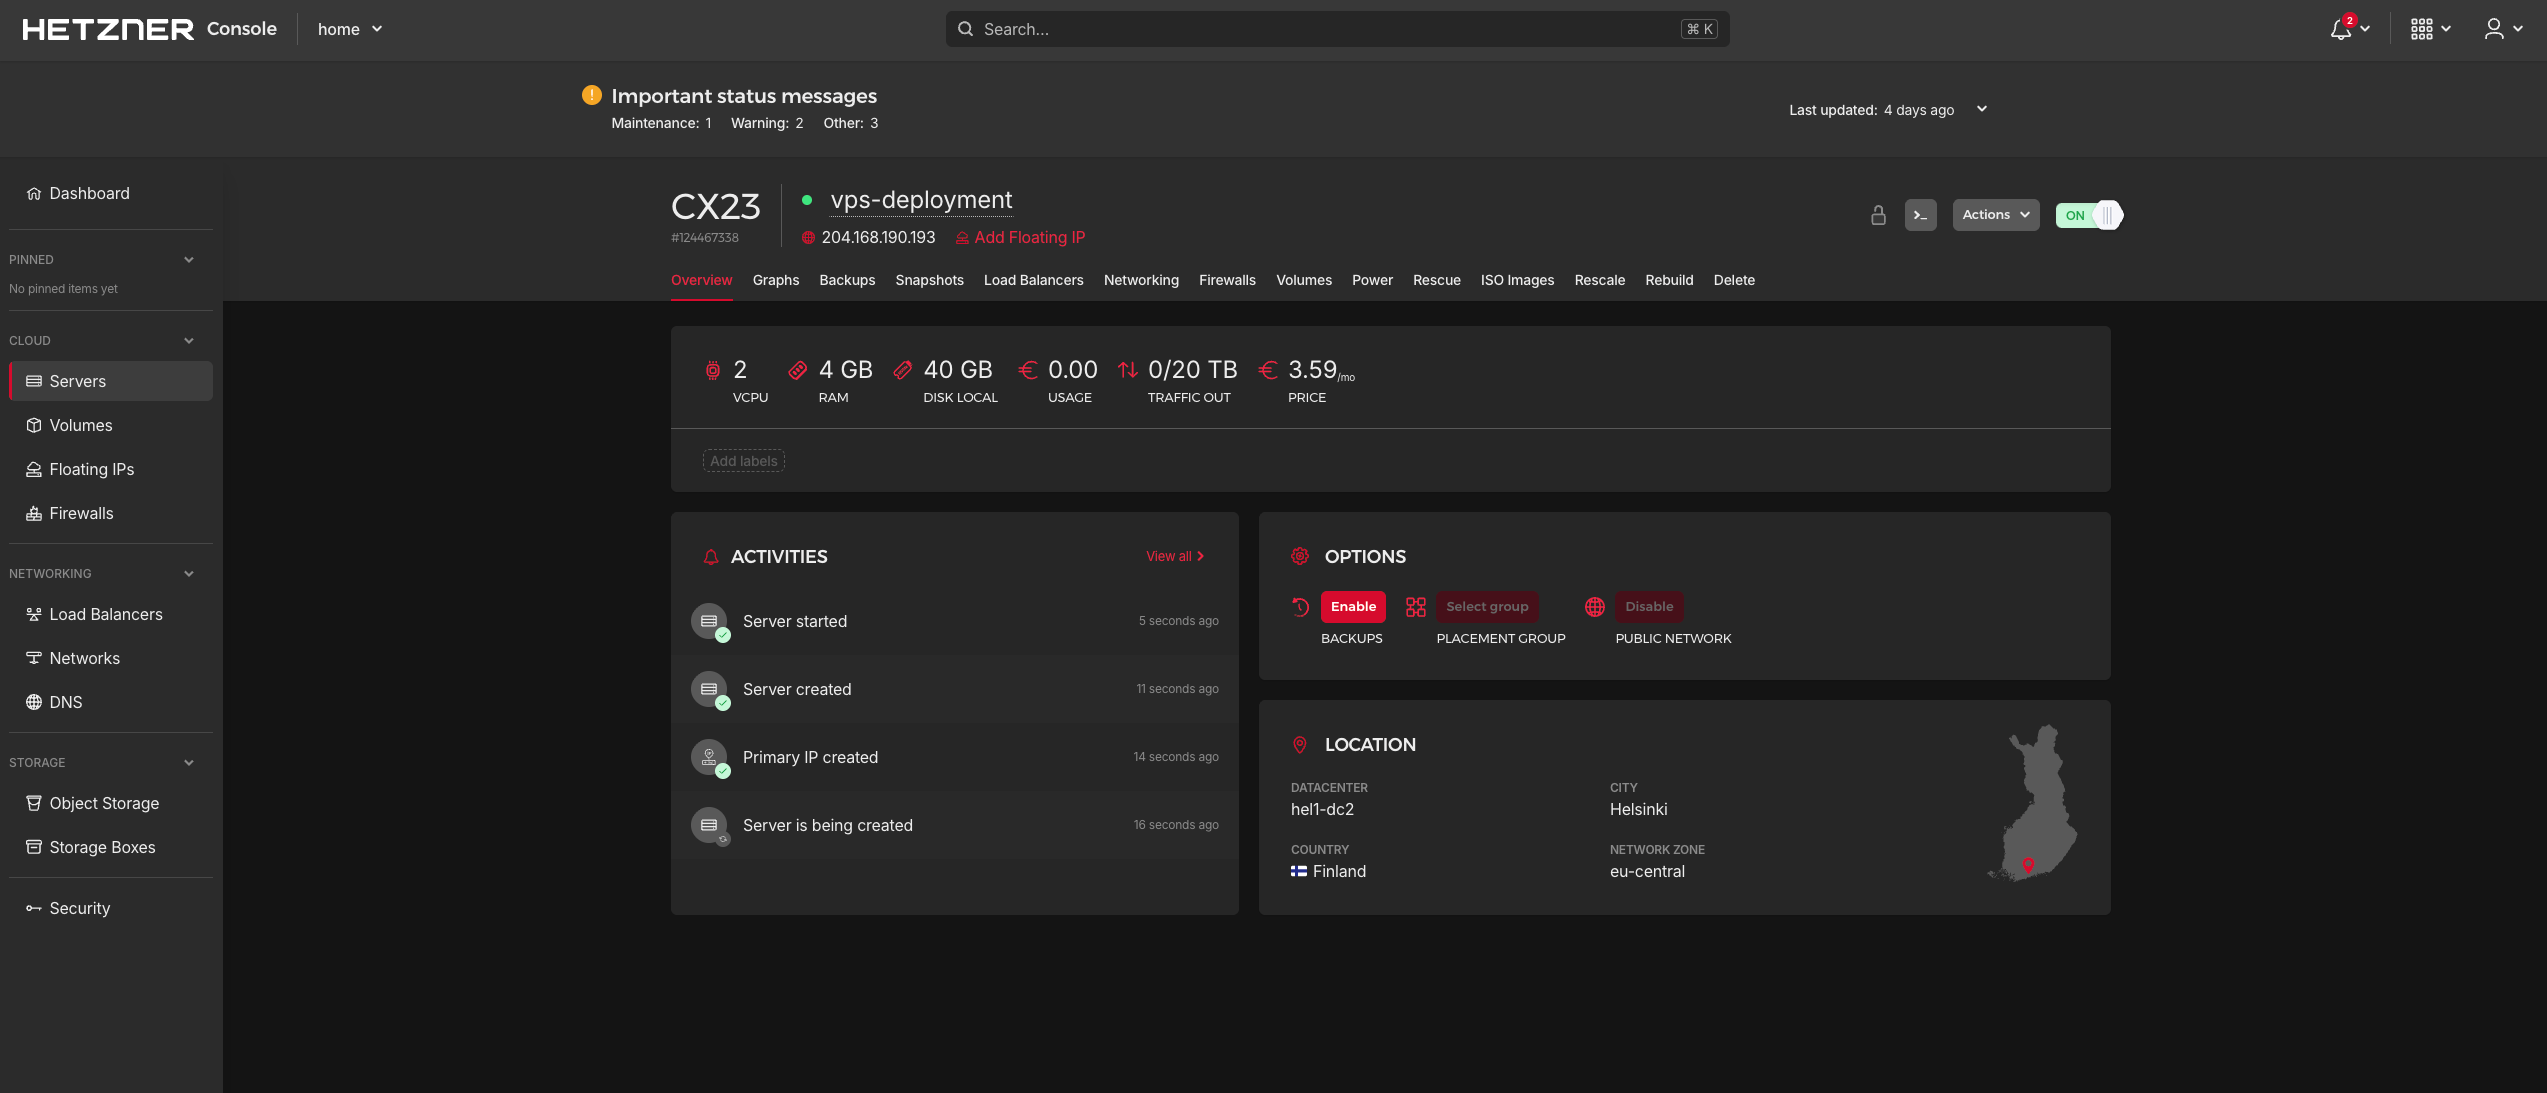
My two favorite VPS providers are Hetzner and Hostinger for their price and reliabilty, in addition to having their servers in Europe. For this project, I’ll choose Hetzner, which comes with an unbeatable pricing plan: 4GB RAM for ~4€/month, cancelable anytime!
On Hetzner, select a cost-optimized instance and add your SSH publickey via the console to be able to connect the first time. Choose Ubuntu as default OS.
If you correclty added your SSH publickey, you should be able to connect to the VPS from the terminal by copying its IP address:
ssh root@204.168.190.193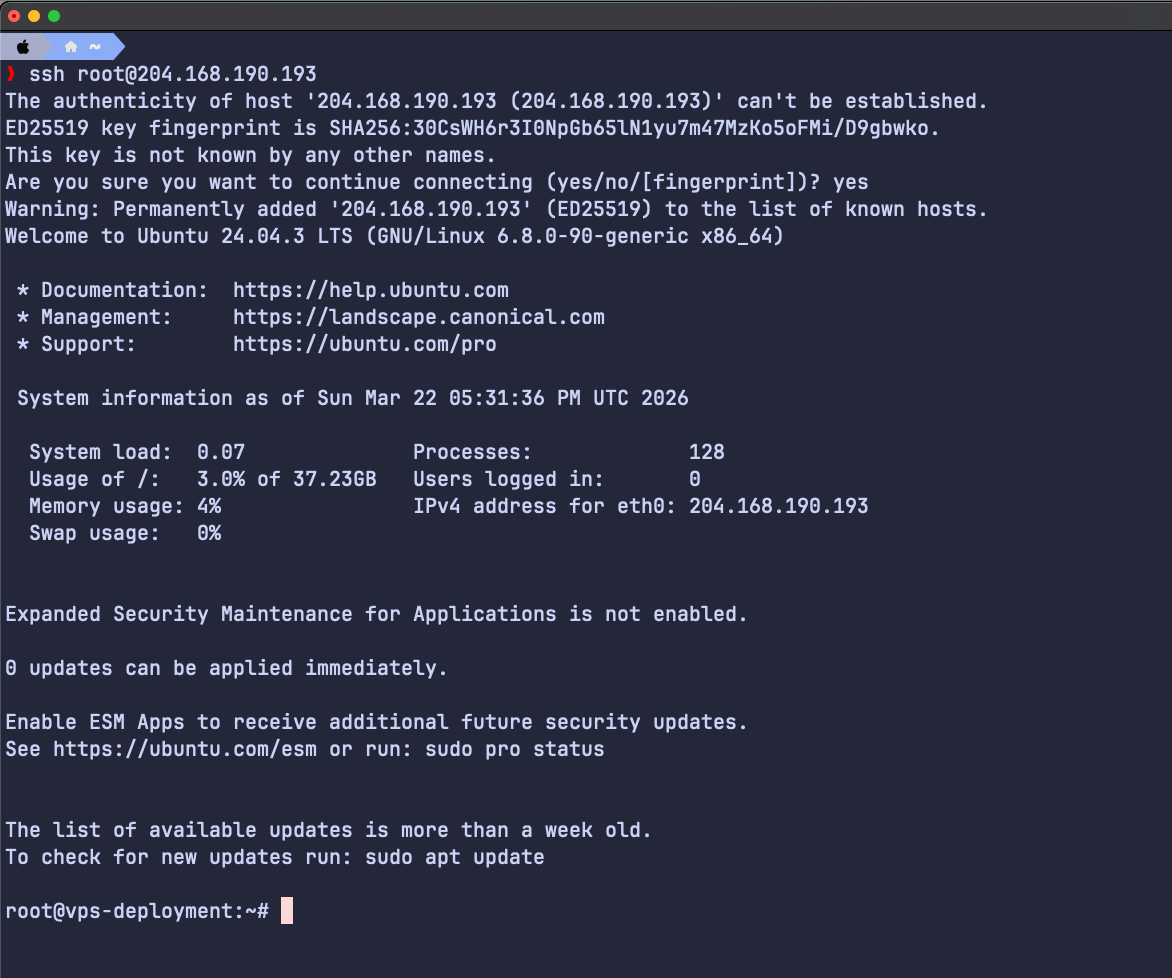
We enter the most important part of this article: securing the VPS. Indeed, it will take no time for attackers to try to brut force the root system of our VPS. Since the VPS is new, there’s nothing to steal. Yet.
Let’s secure it.
We first need to remove the root access. Root user has full control over the instance, which can be dangerous if in the wrong hands. We create a user from which will perform all our actions, instead of root.
We give the new user the sudo rights, meaning it will be able to perform actions as root only if necessary, secured by the user password.
adduser jeremy && usermod -aG sudo jeremy
Now the user is created, this is the last time we access the VPS via root. Let’s disconnect from the VPS and log back via the new user we just created.
The new user having no idea of your SSH publickey, we’ll add it from our local computer. This step is optional, but we’ll not have to enter a password anymore after. Use the same password you configured when creating the new user.
# In local
ssh-keygen -t ed25519 # Create the ssh key (if not already existing)
ssh-copy-id jeremy@204.168.190.193
Then connect without password.
ssh jeremy@204.168.190.193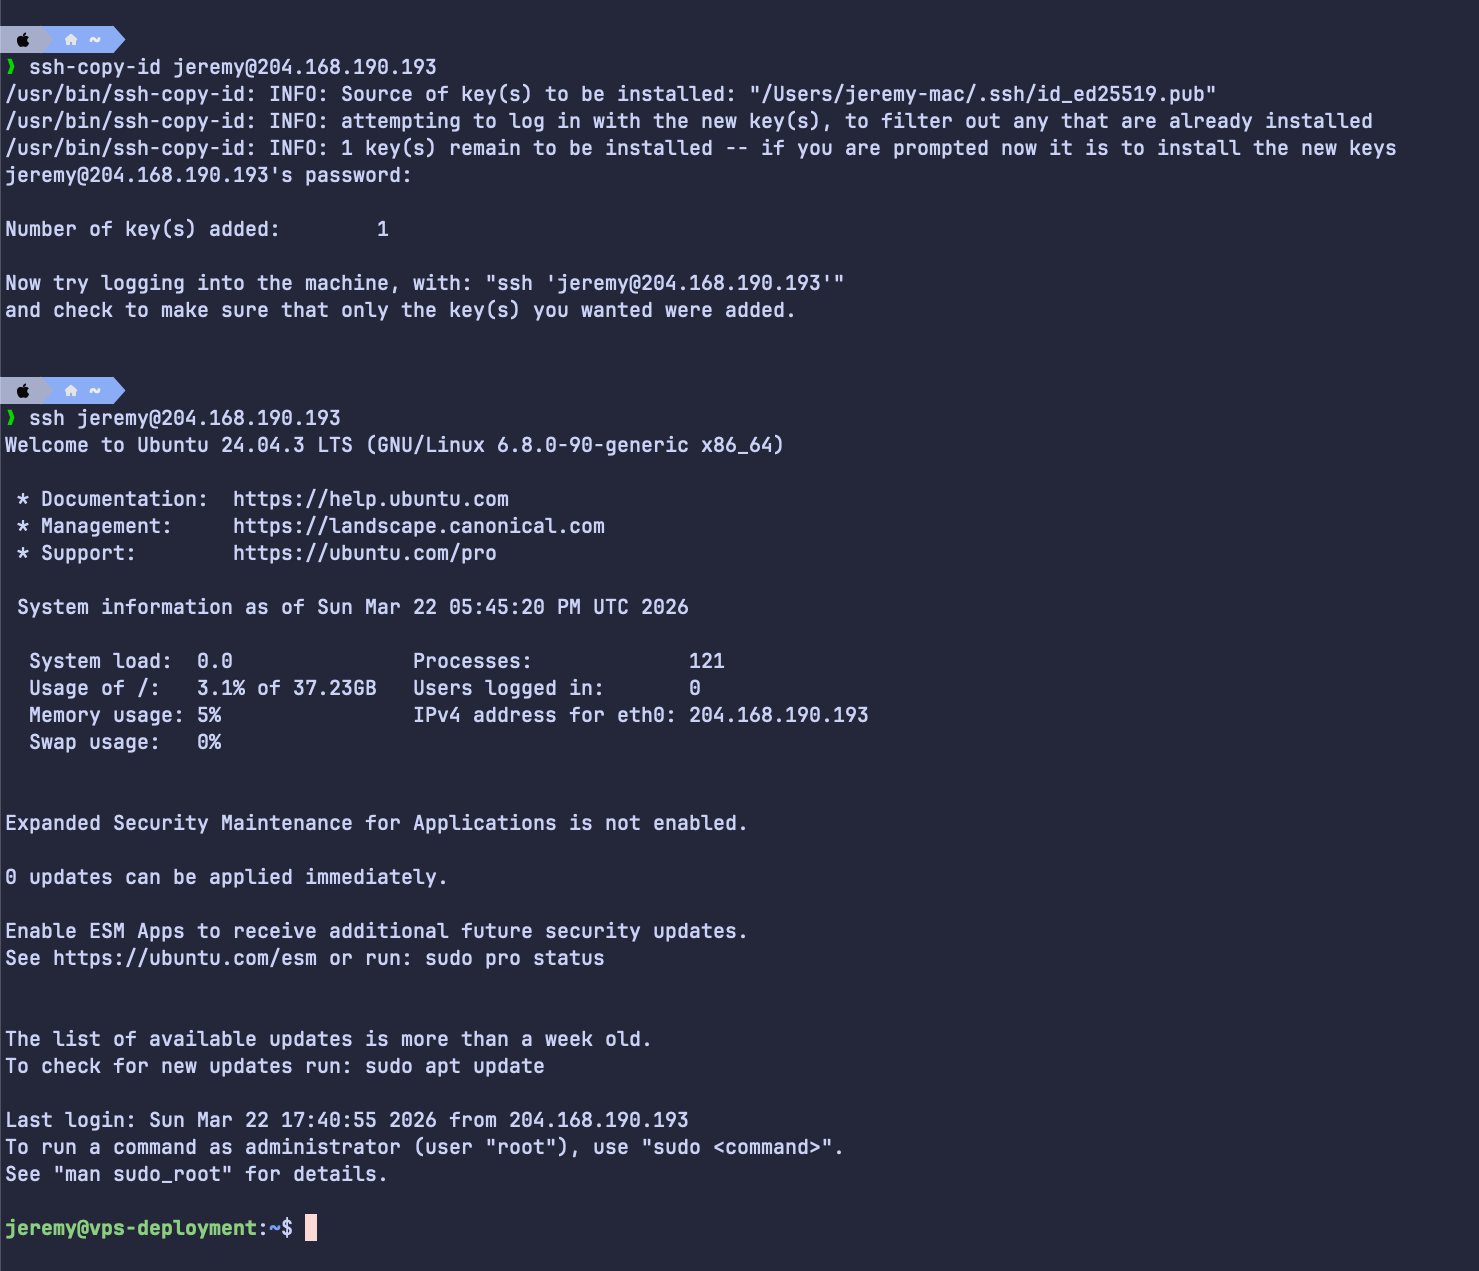
Well done! Your computer is now connected directly to the VPS via a user (and not root anymore).
Since the server is new, it is always good practice to update our packages.
sudo apt update && sudo apt upgrade -yIt’s now time to restrict the connection to everybody except us.
Go to /etc/ssh/sshd-config using the sudo command. You’ll not be able to edit the file otherwise.
sudo vi /etc/ssh/sshd_configConfigure as such:
- PermitRootLogin no
- PasswordAuthentication no
- usePAM no
With this configuration, we will not be able to connect to the root anymore, and only ssh key can be used to connect to the VPS. Once edited, run the following command to apply the new configuration.
sudo systemctl restart sshWe’ll now set up a firewall. Currently, all instance ports are open. We’ll restrict them to the strict minimum: 80 for HTTP connections, 443 for HTTPS, and 22 for SSH.
Be careful to authorize the port 22, otherwise you will be locked outside of your VPS! Keep another terminal window open connected to the VPS until you’re sure you can connect.
# Disable all incoming traffic by default
sudo ufw default deny incoming

# Allow all outgoing traffic by default
sudo ufw default allow outgoing

# Allow SSH (CRITICAL - do this before enabling the firewall)
sudo ufw allow 22/tcp

# Allow HTTP & HTTPS
sudo ufw allow 80/tcp
sudo ufw allow 443/tcp

# Enable the firewall
sudo ufw enable

# Check the rules before enabling
sudo ufw status verbose
Now disconnect (ctrl-d) and try to connect again via ssh. If you did everything right, you should be able to log in via ssh no problem!
Additionally, I like to add a layer of security to protect the VPS from brute-force connections with fail2ban.This will automatically “put in jail” any suspicious connection for a certain period of time.
sudo apt install fail2ban
sudo systemctl enable fail2ban
Finally, you’ll need Docker on the server to run your services. Install Docker Engine by following the installation documentation.
Once installed you’ll face a common problem for everyone: the user you created doesn’t have the permissions to run Docker!
jeremy@vps-deployment:~$ docker ps
permission denied while trying to connect to the docker API at unix:///var/run/docker.sock
To solve this issue, simply give you the rights to use Docker.
sudo usermod -aG docker jeremyLog out and reconnect, and you should be able to use Docker!
jeremy@vps-deployment:~$ docker ps
CONTAINER ID   IMAGE     COMMAND   CREATED   STATUS    PORTS     NAMES
Congratulation! Your VPS is now secured and ready to host your application!
Domain name & DNS
We have the VPS configured and ready to work for us. But our users have no domain name to connect the application, except the IP address: 204.168.190.193.
Not really great for marketing... Therefore, we’'ll pick a domain name for our Note-Taker application! For that, we’ll go on Cloudflare, which provides a Domain Name System (DNS).
Not only it will redirect any requests to our VPS IP address, Cloudflare also comes with nice features for free, such as securing the connection or preventing AI scrapping.
To create a new domain name on Cloudflare, go the webpage and look for Domain. You can then purchase the domain you desire, if it is available of course.
For the sake of this article, I’ll use a domain I already bought: jeremyarancio.com.
Once purchased the most important thing to do is to configure the HTTPS connection. Traefik handles it for you with the proper configuration, but in this case, we can let Cloudflare taking care of it.
We configure the encryption mode to Flexible: any data coming to Cloudflare servers is encrypted, but the connections between Cloudlfare and our VPS is not. Overall the connections to the external world remain secured.

One last step regarding the DNS configuration is to redirect the connections from the domain to the server. To do so, add an A record with the name of the subdomain, here api. If you want to select the root (your domain name), use @ instead. Select Proxied to automatically secure the connections using Cloudflare services.
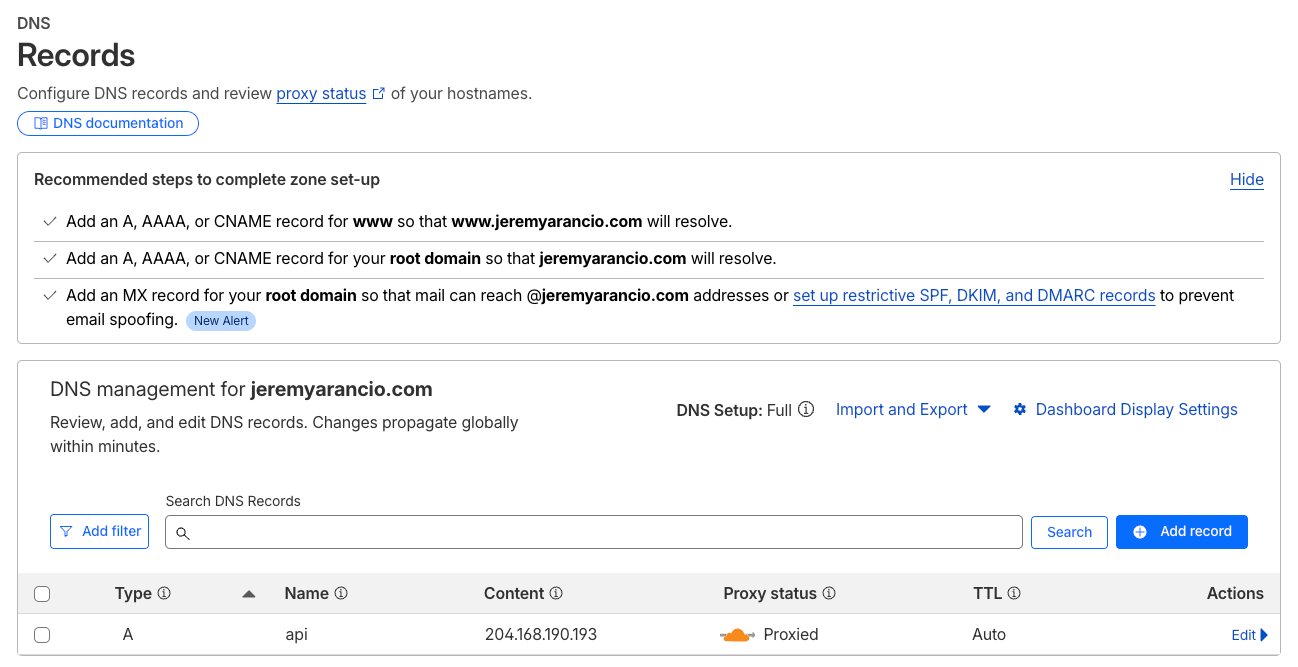
The subdomain now configured on Cloudflare, Traefik will take care of redirecting the traffic to the service api.<domain> as indicated in compose.yml.
#compose.yml
services:
  ...
  api:
    build: .
    labels:
      - "traefik.enable=true"
      - "traefik.http.routers.api.rule=Host(`api.${DOMAIN:-localhost}`)" <<<<< Subdomain
      - "traefik.http.routers.api.entrypoints=web"
      - "traefik.http.services.api.loadbalancer.server.port=8000"
Set up the CI/CD
We’re almost there!
An essential part of Software Development is the Continuous Integration/ Continuous Delivery workflows (CI/CD) to automate tests and deployments.
Trust me, you don’t want to manually update your application everytime you make a change - and face the risk to make mistakes in the process. I went there…
Automating this process early on will make the development of new features a breath, for you and other developers working on the same project.
We’ll use Github Actions for the CI/CD, which comes with an amazing free tier for public projects. To set it up, create at the root of your project .github/workflows/ that will host the CI/CD configuration files.
# .github/workflows/ci.yml
name: CI

on:
  push:
    branches: [main]
  pull_request:
    branches: [main]

jobs:
  lint:
    name: Format & Lint
    runs-on: ubuntu-latest
    steps:
      - uses: actions/checkout@v4
      - uses: astral-sh/setup-uv@v5
        with:
          python-version: "3.12"
      - name: Check formatting
        run: uvx ruff format --check .
      - name: Lint
        run: uvx ruff check .

  type-check:
    name: Type Check
    runs-on: ubuntu-latest
    steps:
      - uses: actions/checkout@v4
      - uses: astral-sh/setup-uv@v5
        with:
          python-version: "3.12"
      - name: Install dependencies
        run: uv sync
      - name: Type check
        run: uvx ty check
In the CI pipeline, we make sure the format of the code is standardized (Ruff) as well as the typing is respected (ty). This will help us keep the code clean and prevent bugs to occur.
# .github/workflows/cd.yml
name: CD

on:
  workflow_run:
    workflows: [CI]
    branches: [main]
    types: [completed]

env:
  REGISTRY: ghcr.io
  IMAGE_BASE: ghcr.io/jeremyarancio/vps-deployment

jobs:
  build-and-push:
    name: Build & Push Images
    runs-on: ubuntu-latest
    if: ${{ github.event.workflow_run.conclusion == 'success' }}
    permissions:
      contents: read
      packages: write

    steps:
      - uses: actions/checkout@v4

      - uses: docker/login-action@v3
        with:
          registry: ${{ env.REGISTRY }}
          username: ${{ github.actor }}
          password: ${{ secrets.GITHUB_TOKEN }}

      - uses: docker/setup-buildx-action@v3

      - name: Build & push API
        uses: docker/build-push-action@v6
        with:
          context: .
          push: true
          tags: |
            ${{ env.IMAGE_BASE }}-api
            ${{ env.IMAGE_BASE }}-api:sha-${{ github.sha }}
Regarding the CD pipeline, we connect Docker to ghcr.io using the secrets variables automatically assigned to Github Actions. No addtional configuration to set up. The CD will build and push the Docker Image Github Container Registry.
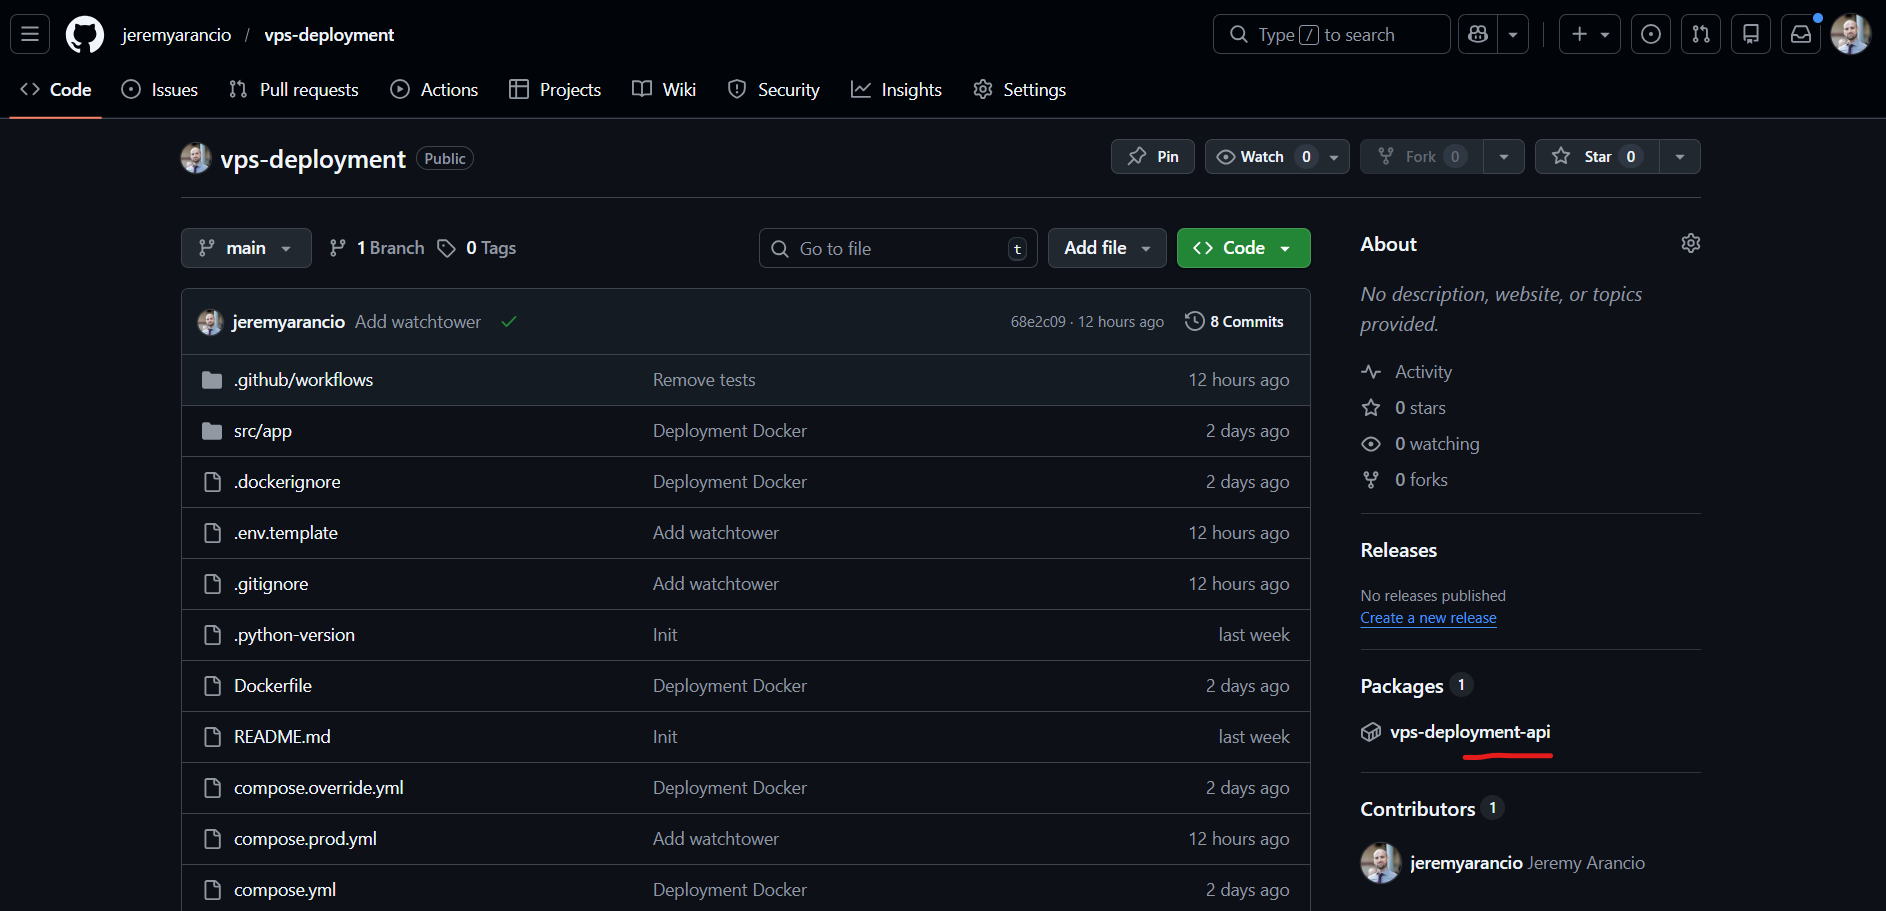
We also add tags with github.sha to enable rollbacks in case a modifcation breaks the production.
The container registry is extremely useful for the VPS configuration with Docker Compose. Indeed, we’ll use WatchTower, an open-source project that automatically scan and pull Docker Image from the container registry when a new version is detected.
To configure it, add to compose.prod.yml:
services:
  traefik:
    restart: unless-stopped

  api:
    image: ghcr.io/jeremyarancio/vps-deployment-api:latest
    deploy:
      replicas: 3
    labels:
      # Rate limiting: 50 req/s average, allows bursts up to 100
      - "traefik.http.middlewares.api-ratelimit.ratelimit.average=50"
      - "traefik.http.middlewares.api-ratelimit.ratelimit.burst=100"
      # Prevents clickjacking by blocking iframe embedding
      - "traefik.http.middlewares.api-headers.headers.frameDeny=true"
      # Tells older browsers to block reflected XSS attempts
      - "traefik.http.middlewares.api-headers.headers.browserXssFilter=true"
      # Prevents browsers from MIME-sniffing a response away from the declared content type
      - "traefik.http.middlewares.api-headers.headers.contentTypeNosniff=true"
      # Apply middlewares
      - "traefik.http.routers.api.middlewares=api-ratelimit,api-headers"
    restart: unless-stopped

  # ADD HERE
  watchtower:
    image: containrrr/watchtower
    restart: unless-stopped
    volumes:
      - /var/run/docker.sock:/var/run/docker.sock
    command:
      - --label-enable
      - --rolling-restart
      - --interval
      - "120"
    environment:
      - REPO_USER=${GH_USER}
      - REPO_PASS=${GH_PASSWORD}
      - DOCKER_API_VERSION=1.53 #Bug with watchtower (https://github.com/containrrr/watchtower/issues/2126)
Watchtower requires the container registry credentials to pull the Docker image. In the case of Github, create a new token in Profile/Settings/Development, then add them to the .env.prod file you copied from .env.template.
#.env.prod
DOMAIN="jeremyarancio.com"

GH_USER="jeremyarancio"
GH_PASSWORD=<your-token-here>
With this configuration, we’re ready to finally deploy our application to the world!
Deploy your services
We finally did it! Everything is now configured to welcome our long lasting application in its new home: the VPS.
SSH into the server and git clone the Github repository where the code and the docker configuration lives.
git clone https://github.com/jeremyarancio/vps-deployment.gitLaunch your services using the production configuration. Don’t forget to copy the .env.prod file to the VPS from your local computer.
docker compose -f compose.yml -f compose.prod.yml --env-file .env.prod up -dAnd if everything is alright, you should be able to reach your newly deployed service at: api.<your-domain.com>.
Let’s wrap it up!
In this article, you learned how to deploy services on your own VPS and domain name using Docker Compose, Traefik and Watchtower.
The process might look cumbersome at first, with many steps to correctlly set up everything. But once done, it will serve you will for month, or even years. I personally have been runnning a full stack app for over a year with users without any server issue!
Also, in the context of data privacy and the US Cloud Act, allowing the US government to check any data all over the world if it is stored by a US company (Azure, GCP, or AWS), it becomes even more important your data stays private.
You can check the complete configuration in the Github repository. Don’t hesitate to reach out to me if you have any question, or raise an issue.
Enjoy deploying your own applications!